Introduction
Updated on 10/14/2018 with newer versions of DOSBox and some additional terminal programs beyond Telemate. Also corrected location of macOS preferences file.
If you're like me, you've been searching for a decent telnet client that works as well with old BBS ANSI as well
as maybe having a scripting language. Again, if you're like me, you've got a large library of scripts for older
DOS based terminal programs like Telemate that you'd like to be able to use again. (As I'm typing this, I'm
scripting the 1st Arena of Tele-Arena 5.6f on the beta test board for it). It took some digging, but I've come up
with a way to make Telemate 4.2x run in Windows or macOS AND operate as a telnet client. (Crazy, I know, right?)
This tutorial is long winded and detailed. Those of you who are tech savvy may be able to breeze through this pretty
quick, those of you that aren't can still accomplish the task if you follow the instructions carefully. I've geared
this toward the most popular of the operating systems. Win XP/Vista/7/8/10 and macOS. This has been tested, personally, in
WinXP x86, Win7/10 x64, and macOS Lion thru High Sierra. You can likely get it to work in any Intel macOS or just about any flavor of
Linux. This will also likely turn ANY DOS terminal program into a telnet application. So if you preferr Telix or
Procomm Plus over Telemate, you should be able to make that happen with this tutorial. Ready? Me too!
Gathering Components
First step was to dig up my old Telemate disks. Here are two links, to two versions of Telemate. (There are also other
terminal programs below. This guide is focused on Telemate, but the others are here for conveinence.) If you're lucky
enough to still have your registration number, you'll be in good shape. I've provided links to v4.20 and v4.21
as the registration number are
different depending on what version you had. I had v4.20. If you're not
still lucky enough to have your registration number... Google is your friend. That's all I'll say.
NOTE: All software provided below are either shareware or trial/demo versions. Starbase21.net does not host any full/registered versions.
Telemate v4.20 |
Telemate v4.21 |
Telix 3.51 |
Qmodem 4.6 Test Drive |
Procomm 2.4.3
The other component you need is DOSBox. If you do any classic gaming (Doom, Duke3D, Wolf3D, etc...) you may already
have this piece, but you can head over to
www.dosbox.com to grab the latest version.
I've included the latest versions below at the time of this writing. These versions have been tested with this method
and work:
Windows (XP/Vista/7/8/10):
DOSBox0.74-2-win32-installer.exe (x86 version, but 100% working on x64 machines!)
macOS Users:
DOSBox-0.74-2_Universal.dmg (Tested in High Sierra, should work on any Intel Mac)
Alright, here's a checklist. Make sure you've downloaded and saved:
1. A copy of Telemate v4.2x
(or your favorite DOS terminal program)
2. Whatever flavor of DOSBox needed for your OS
Installation Instructions
STEP 1: Read the complete instructions before attempting any installation. Being familiar with "the next step" before
it's time will help greatly.
I'm not going to go indepth on the installation of exactly how to install programs and such. This tutorial assumes
that you're an old school BBS'er, and you've got basic skills to install programs, find and edit config files, and
have a general understanding of how this works. You can contact me on my BBS if you need assistance, and I'll help
where I can, but keep in mind this is free advice and I offer no warranty and am not responsible for any damage you
may to do your system from screwing around with this sorta stuff. That being said, it's very easy to setup if you can
follow directions... so here we go!
This next step is to install DOSBox for your OS.
Windows & macOS Users - DOSBox installation
The first step is pretty damn easy. Go to where ever you saved the install file, and double click DOSBox#.##-win32-installer.exe
[or the .dmg file if you're a Mac user] (where #.## is the version number) and go through the install process [On macOS, just drag
DOSBox.app into your Applications folder]. Run DOSBox once and close it, this creates the blank config file. Once it's closed you
need to configure two things. The first is the folder for your "DOS C: Drive" and the second is the modem. Depending on what your
OS is the configuration file will be in one of these locations:
Windows XP: %USERPROFILE%\Local Settings\Application Data\DOSBox\dosbox-#.##.conf
WinVista & Win7/8/10: {system drive}:\Users\{username}\AppData\Local\DOSBox\dosbox-#.##.conf
macOS Users: ~/Library/Preferences/DOSBox #.## Preferences
Remember, #.## will be the version number of DOSBox that you installed! The version I'm hosting here is 0.74.
Open that file in your favorite text editor (Win: notepad / OSX: Textedit will do) and make the following two changes:
Look for this section around line 199. You can search for "serial" to find it.
[serial]
# serial1: set type of device connected to com port.
# THERE ARE MANY MORE COMMENTED OUT LINES IN THE REAL FILE, I'M CUTTING IT SHORT IN THIS TUTORIAL

serial1=dummy
serial2=dummy
serial3=disabled
serial4=disabled
Once you find this section, change "serial1" and "serial2" to the following. Leave everything else in that section alone.
serial1=modem listenport 23
serial2=disabled
The next change you need to make to the config file is the automatic mounting of your "dos c: drive" folder. Scroll all the way
to the bottom of the config file until you see this (you can search for "autoexec" to find it):
[autoexec]
# Lines in this section will be run at startup.
# You can put your MOUNT lines here.
Depending on your OS, you need to create a folder on your drive AND put one of the following lines here. Again this tutorial
assumes "C:\dos" for Windows users and "~/Downloads/dos" for macOS users. You can tailor this however you want:
For Windows users create a folder called "dos" in the root of your C: drive and add this to the DOSBox config file:
mount c c:\dos
For macOS users create a folder in your Downloads folder called "dos" and add this to the DOSBox config file:
mount c ~/Downloads/dos
We're almost there!! The next step is to uncompress the Telemate version you downlaoded into your "dos" folder that you
created in the previous step. Best thing to do is create a folder called "TM" in the "dos" folder, and put the Telemate files
in there. Once you've done that it's time to launch DOSBox. If everything was done correctly you should get something that looks
like this:
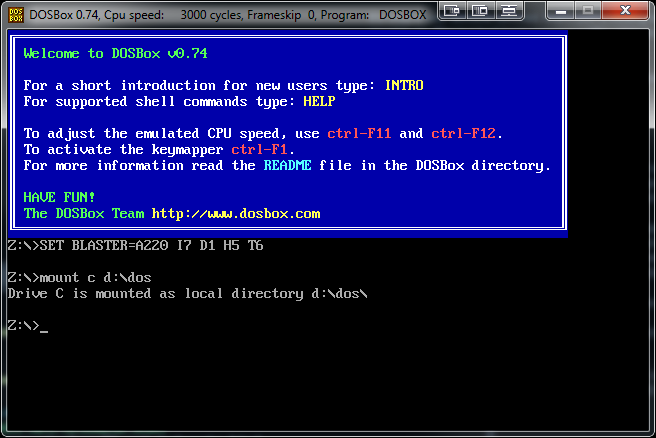
Now, switch to the C drive and change to the TM directory:

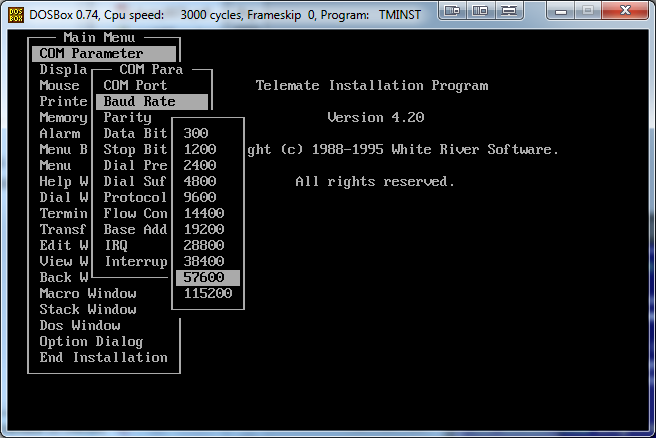
Then type TM and hit enter, the first time you launch it you will get a "setup" screen. The only thing you should change is go to COM Parameter and change Baud Rate to 57600
(unless you're feeling nostalgic and want it to be slower!) once you've done that go all the way down to "End Installation" and choose "Save Setup." If it doesn't
automatically launch into Telemate, just type TM and hit enter, it should launch Telemate.
Here's a screenshot of the seutp screen. You can get to this later by typing TMINST at the command prompt:
Once you launch Telemate, you should get a window like this. If you see the phonebook screen, just hit "ESC" to get to the terminal window.
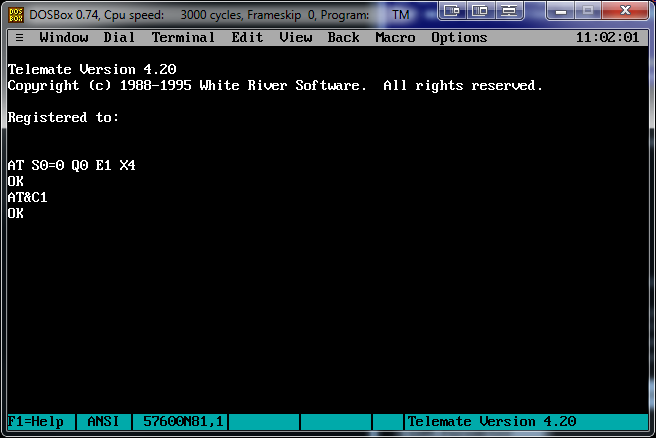
The most important thing here is that you see "OK" repsonses after the "AT" commands issued to the "modem." Sometimes I see "ERROR" on the first command, but if you
get an OK on the second, it's usually good to go. In fact, if you're getting responses at all, it means DOSBox is doing it's job and you're well on your way to
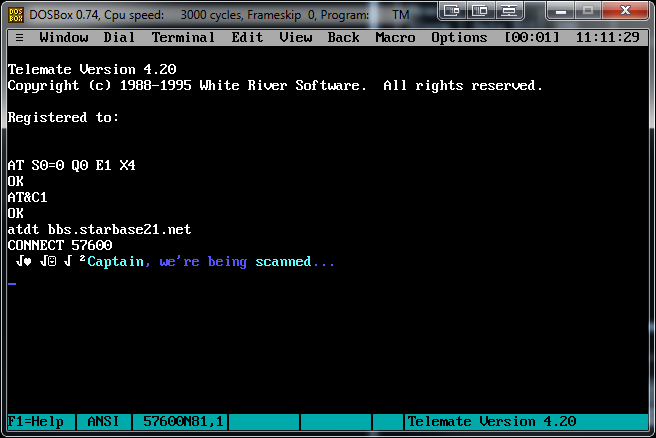
doing some good old fashioned BBS'ing. Easiest way to get connected is to just type the dial command, but use a hostname instead of a phone number. If you can't remember
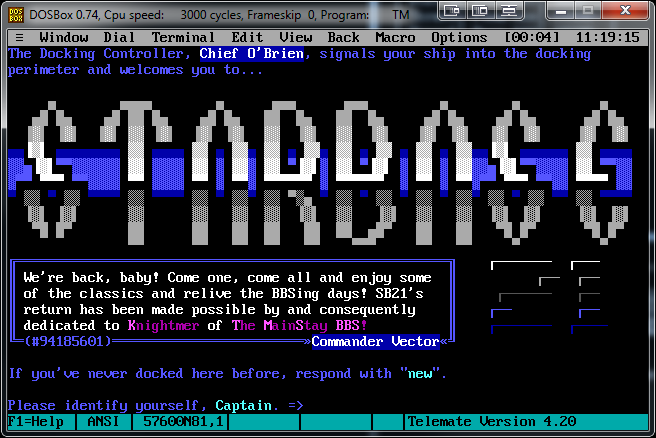
the command is ATDT (number) and then hit enter. Below is an example of connecting to StarBase 21 with Telemate and this setup.
 Final Notes
Another hint is if you have you're Telemate registration number, just type "TM /R" at the "C:\TM>" prompt and it will let you enter the information.
That's it. You're good to go! If you have any questions, e-mail me, Vector, on StarBase 21 BBS and I'll do what I can to help. A Tele-Arena script collection that was
made available by "bhuga" on Github is linked below under the "Tele-Arena Stuff" section at the bottom of this web site. These scripts circulated amongst our group at
The Point BBS back in the 90s. Feel free to hack them for your use, just give credit where it's due. You can configure Telemate how you like by going into the Options menu
and changing what you like. If you want to make TM launch a little faster, you can edit the Modem Init String in the Telemate options to just "ATZ^M" and save it.
Additionally, I usually setup some macros, increase the scroll back buffer, etc... You can set up phone book entries if you like. Just have fun with it.
If you come across anything exciting that makes this easier or better, e-mail me and I'll add it to the page. Huge Thanks goes out to the creator(s) of
DOSBox. Without those programs, it certainly wouldn't be possible to accomplish this.
See you out there ... Vector
